7 Confocal Microscopy

One problem with fluorescence microscopy is that thick, three-dimensional objects often appear blurred due to out-of-focus light. Consider this scenario: you have a lot of lit candles in a dark room at varying distances from you (Fig. 1). If you focus on candles at a certain distance and take a photo, your picture will also include blurred images of the light coming from the candles that are closer and farther away. This could be a nice effect for a photo, but if there were hundreds of candles it would be difficult to see the candles you’re focused on clearly.
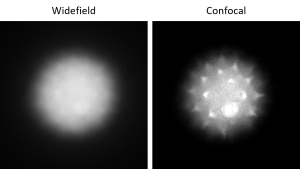
The same thing happens in fluorescence microscopy except instead of candles, we have fluorophores. Figure 2 shows two images of the same pollen grain, imaged using widefield (“normal”) and confocal fluorescence microscopy. Confocal microscopy eliminates out-of-focus light so that you can see the in-focus objects clearly. Note that the spikes on the pollen grain are visible in the confocal image but barely distinguishable from the out-of-focus fluorescence “haze” coming from the rest of the pollen grain in the widefield image.
The Basic Confocal Principle
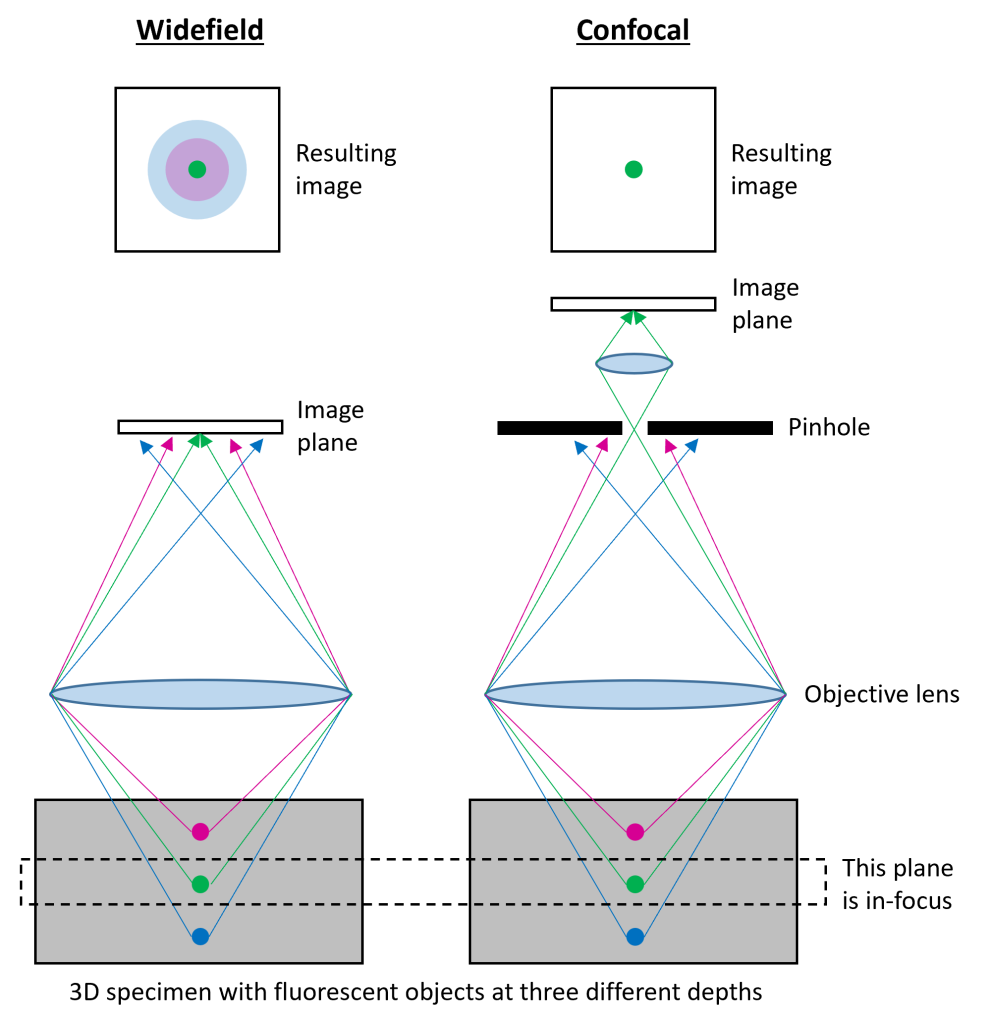
In widefield fluorescence microscopy, light from all planes in a 3D specimen is collected by the objective and formed into an image at the “image plane” (e.g. the camera; Fig. 3). Notice how the light rays from the green dot converge to a point at the image plane while the blue and magenta dots converge too early and too late, respectively. The resulting image contains in-focus light from the plane of the specimen that is in-focus (green dot), but also blurred light from the planes that are out-of-focus (magenta and blue dots). Confocal microscopy removes the out-of-focus light from your image by sending all the light coming from your specimen through a tiny pinhole through which only in-focus light can pass. Light from the in-focus plane (green dot) converges just in time to go through the pinhole, while the light from the out-of-focus areas converges too early or too late to pass through the pinhole. In a certain sense, light from in-focus areas is “sharp” and can pass through the small pinhole while light from out-of-focus areas is blurry and too “diffuse” to pass through the pinhole.
Video
Differences between Confocal and Widefield Microscopy
Besides excluding out-of-focus light, confocal microscopy has several major differences with widefield fluorescence microscopy:
-
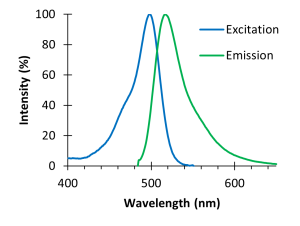
Fig. 4: Spectra for a green fluorophore. Excitation light is provided by a laser tuned to a specific wavelength instead of white light sent through an excitation filter. Consider the fluorophore spectra shown on the right. A widefield microscope would use a filter to excite the dye with a range of light between 450 and 500 nm. A confocal microscope would use a single wavelength located at the peak excitation wavelength (490 nm).
- The emission filter ranges can be adjusted. Widefield fluorescence microscopes use filters with ranges that cannot be changed–they are set when the filter is manufactured. Our confocal microscope uses a special technology that allows you adjust the emission filter ranges on demand. (Note that not all confocal microscopes have this feature.)
- Images are acquired pixel-by-pixel instead of all at once. The laser scans across the specimen very fast, imaging the pixels from left to right, row by row, from top to bottom. Emitted light from the specimen is collected, pixel-by-pixel, by a detector that is like a camera but for a single point only. The computer builds an image from each of the pixels to display on the screen. Our eyes cannot do this. To view your specimen through the oculars, you need to use normal widefield fluorescence excitation. You can only view a confocal image using the computer. Because images are acquired pixel-by-pixel rather than all at once with a camera as in widefield microscopy, imaging is slower.
- Confocal images tend to be dimmer and noisier (low signal-to-noise ratio; SNR) because the tiny pinhole excludes almost all the light coming from the specimen. You will learn how to compensate for these problems during your training.
- Confocal microscopes can image multiple different color fluorophores simultaneously. Simultaneous detection increases the speed of imaging, but can cause problems if the excitation and emission spectra of the fluorophores are too close together. This can result in the fluorescence of one channel “bleeding-through” to the next channel, causing you to see a fluorescent object in the incorrect channel.
Video
Please watch this Imaging Multiple Fluorophores video[2] up to time 8:40 to learn more about bleed-through (also known as cross-talk).
We will discuss these issues in greater depth and cover additional considerations during your training.
Note that there are multiple disadvantages to using confocal over widefield microscopy: confocal is typically slower and produces dimmer and noisier images that could be subject to bleed-through. The confocal’s primary advantage over widefield is that it can reduce out-of-foucs light. Therefore, if your specimen is not very three-dimensional on the scale you are imaging, it might be better to use widefield rather than confocal microscopy. The fancier technique is not always the better technique.
One final note: There are actually two kinds of confocal microscopy. This reading is about “laser scanning” confocal. “Spinning disk” confocal is similar but has a few important differences that are not discussed here.
